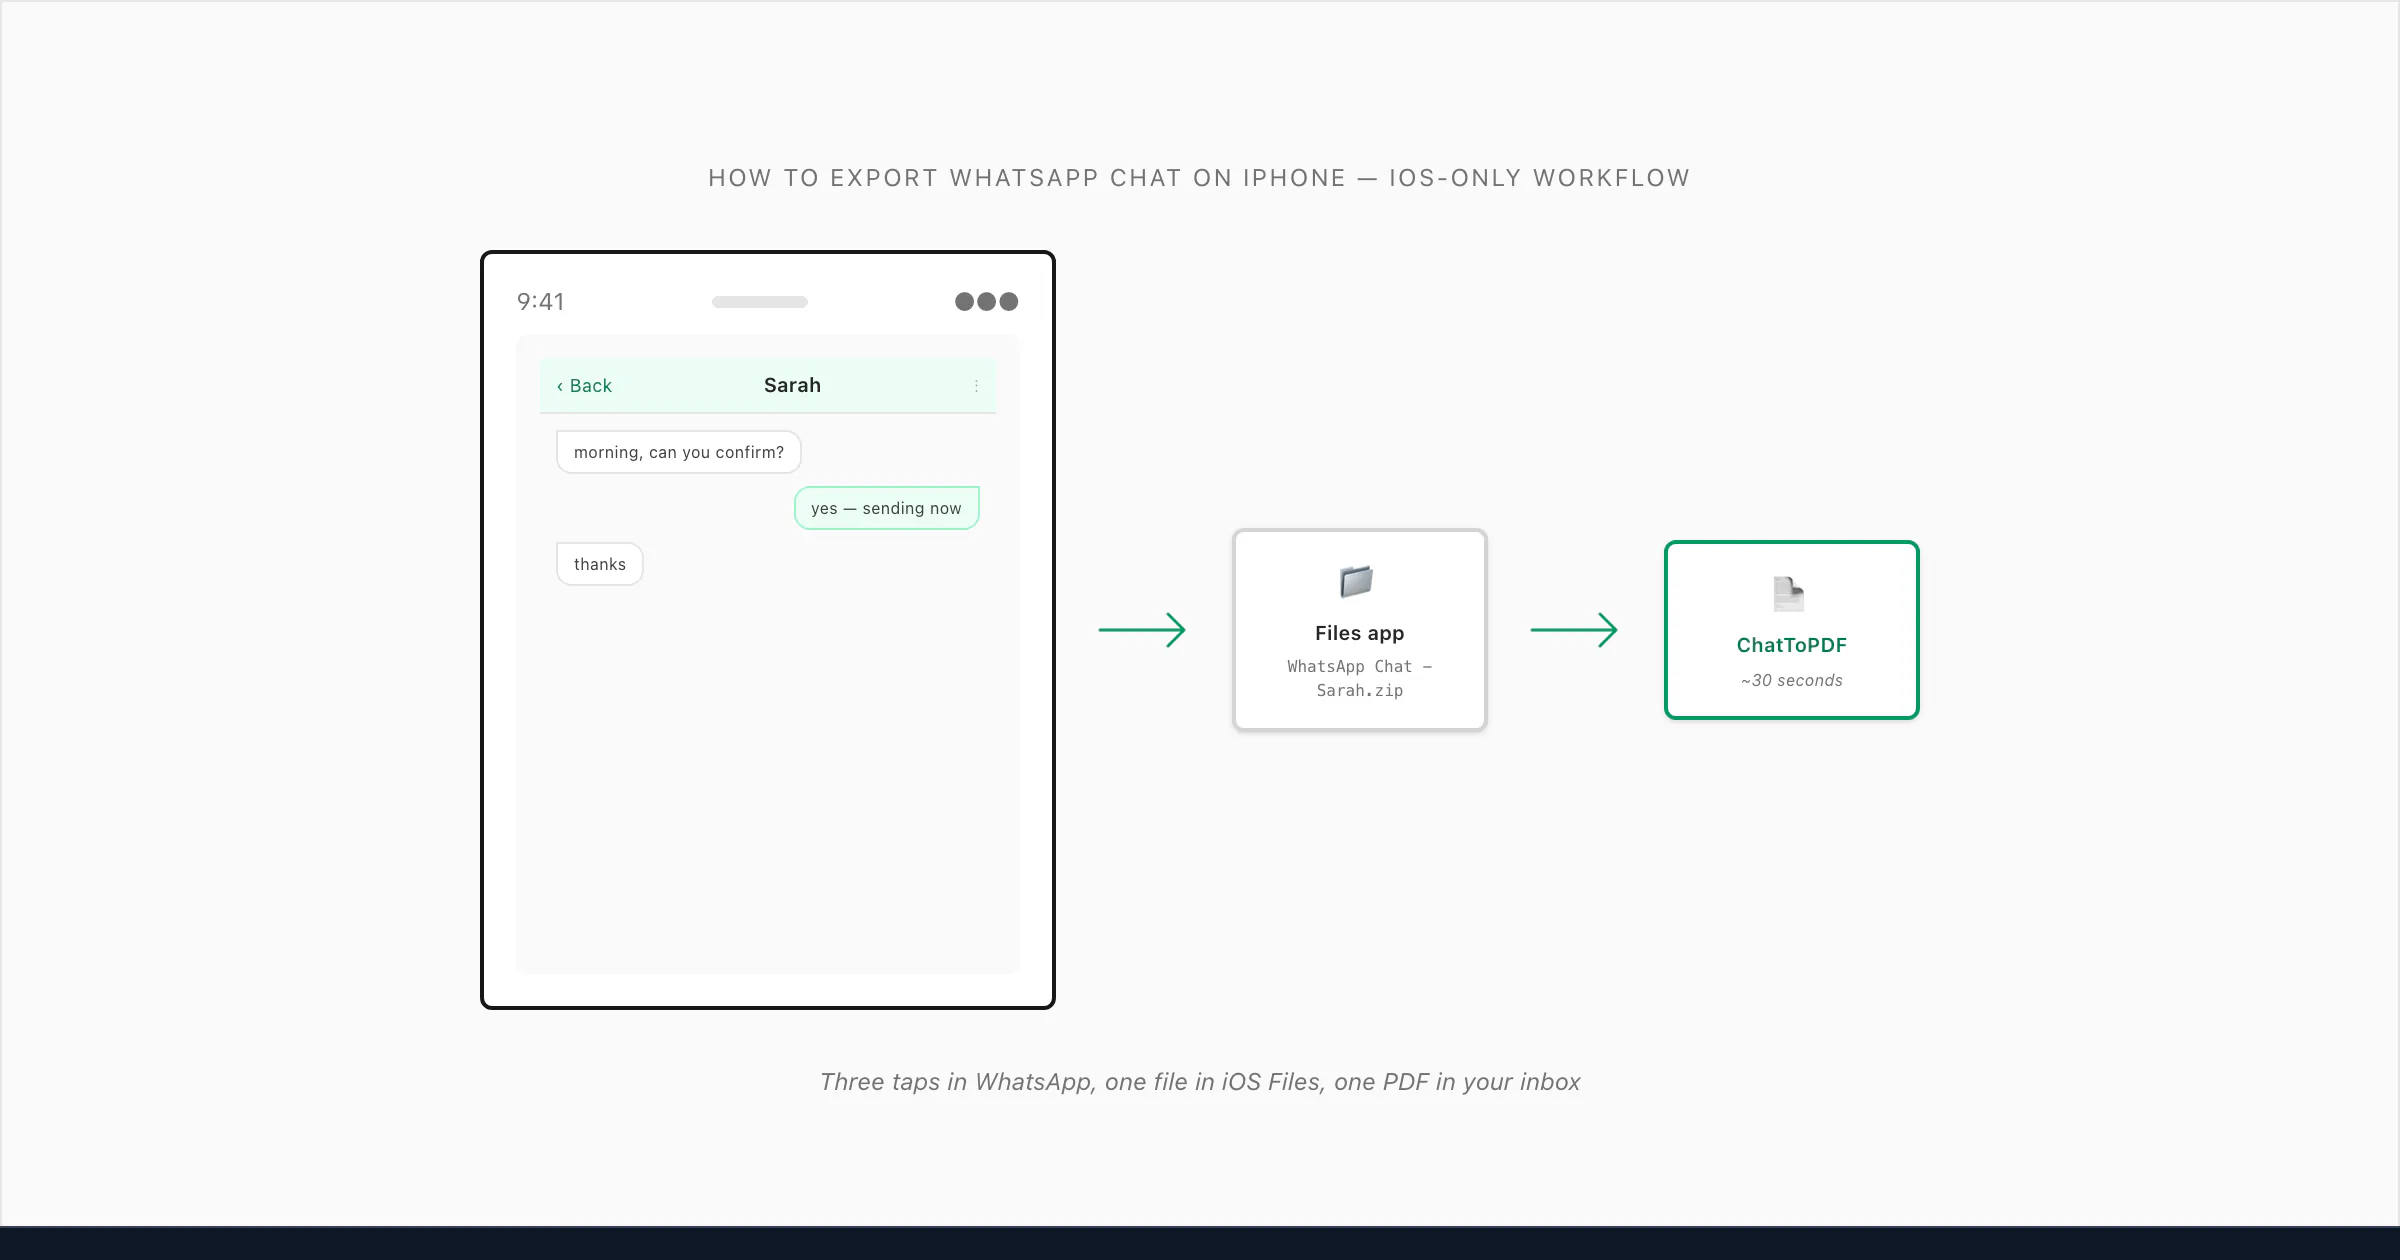
To export a WhatsApp chat on iPhone: open the chat, tap the contact or group name at the top of the screen, scroll to the bottom of the info page, tap Export Chat, choose Without Media or Including Media, then tap Save to Files. The ZIP lands in the iOS Files app. Upload it to ChatToPDF to get a formatted, sender-attributed PDF by email in about 30 seconds. The menu is at the bottom of the contact info screen — not on the chat screen itself.
Why iOS hides the Export menu (and where it actually lives)
- Export Chat (iPhone)
- On iPhone, WhatsApp's Export Chat option is accessed by tapping the contact or group name at the top of the chat to open the info screen, then scrolling to the bottom. It is not on the chat screen itself. Tapping it prompts a choice between Without Media (text only) and Including Media (text plus photos, voice notes, and documents), then presents the iOS share sheet to pick a save destination.
If you came to this guide because you had an iPhone in your hand, opened a WhatsApp chat, and could not find an Export option anywhere, you are not missing anything obvious — the menu really is hidden. iOS does not put it on the chat screen, and it is not under a three-dot button at the top right (because there is no three-dot button at the top right on the iPhone version of WhatsApp). It is buried at the bottom of a different screen entirely: the contact info or group info screen, which you reach by tapping the chat title at the very top of the chat.
This is the single thing the iOS workflow gets wrong from a discoverability standpoint. On Android, the menu is exactly where you would expect — three dots, More, Export Chat. On iPhone, you have to know that tapping the chat title — that quiet bit of header text — opens a whole other screen, and that the export action is at the bottom of THAT screen. I have watched people spend ten minutes hunting for it. It is hidden in plain sight.
I built ChatToPDF after going through this exact hunt myself, with a chat I needed to preserve before swapping phones. Once you know the path, the export takes about 90 seconds. I want to make sure you know it. The pillar guide WhatsApp Android to iPhone covers the broader case where you are also moving from one phone to another, but this page is for the pure-iOS scenario: you have an iPhone, you want to export a chat from THAT iPhone, and you are not switching devices. If you typed "WA" instead of WhatsApp, the same workflow in shorthand prose lives at export chat WA iPhone. If your endpoint is a Windows desktop rather than the iPhone itself, jump to export WhatsApp chat from iPhone to PC for the three real iCloud, iTunes, and cloud-bridge paths.
The six-tap path — every step, in order
Here is the full iOS workflow with no shortcuts skipped. Six taps, plus picking a save target. Most people land at a finished PDF in under two minutes from the moment they open WhatsApp.
Open the chat in WhatsApp
Open WhatsApp, tap the Chats tab at the bottom, scroll to the conversation you want to export, and tap it open. You should be looking at the message bubbles. Do not tap the camera, the call icon, or the three-dot button — those go elsewhere. The next step happens at the very top of the screen.
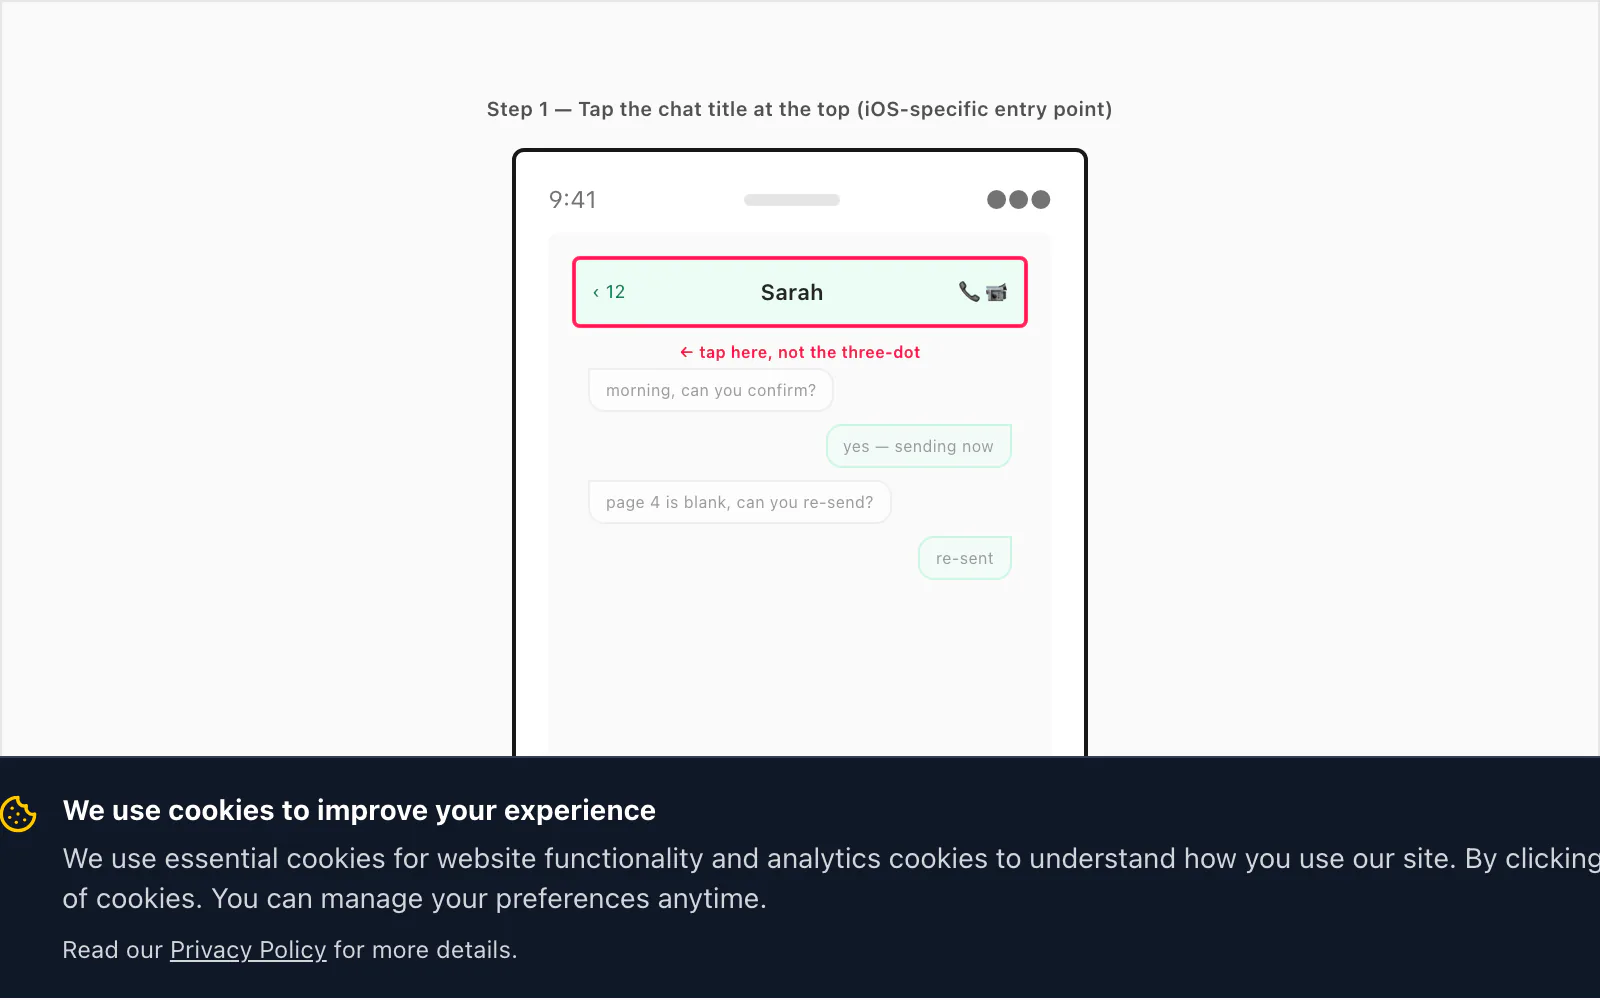
Tap the chat title at the top of the screen
The contact's name (for a one-on-one chat) or the group name (for a group) sits at the top of the chat as a small piece of header text. Tap it. iOS slides up the contact info or group info screen — a longer scrollable list with an avatar at the top and rows of options below. This is the iOS-specific entry point you have to learn once.
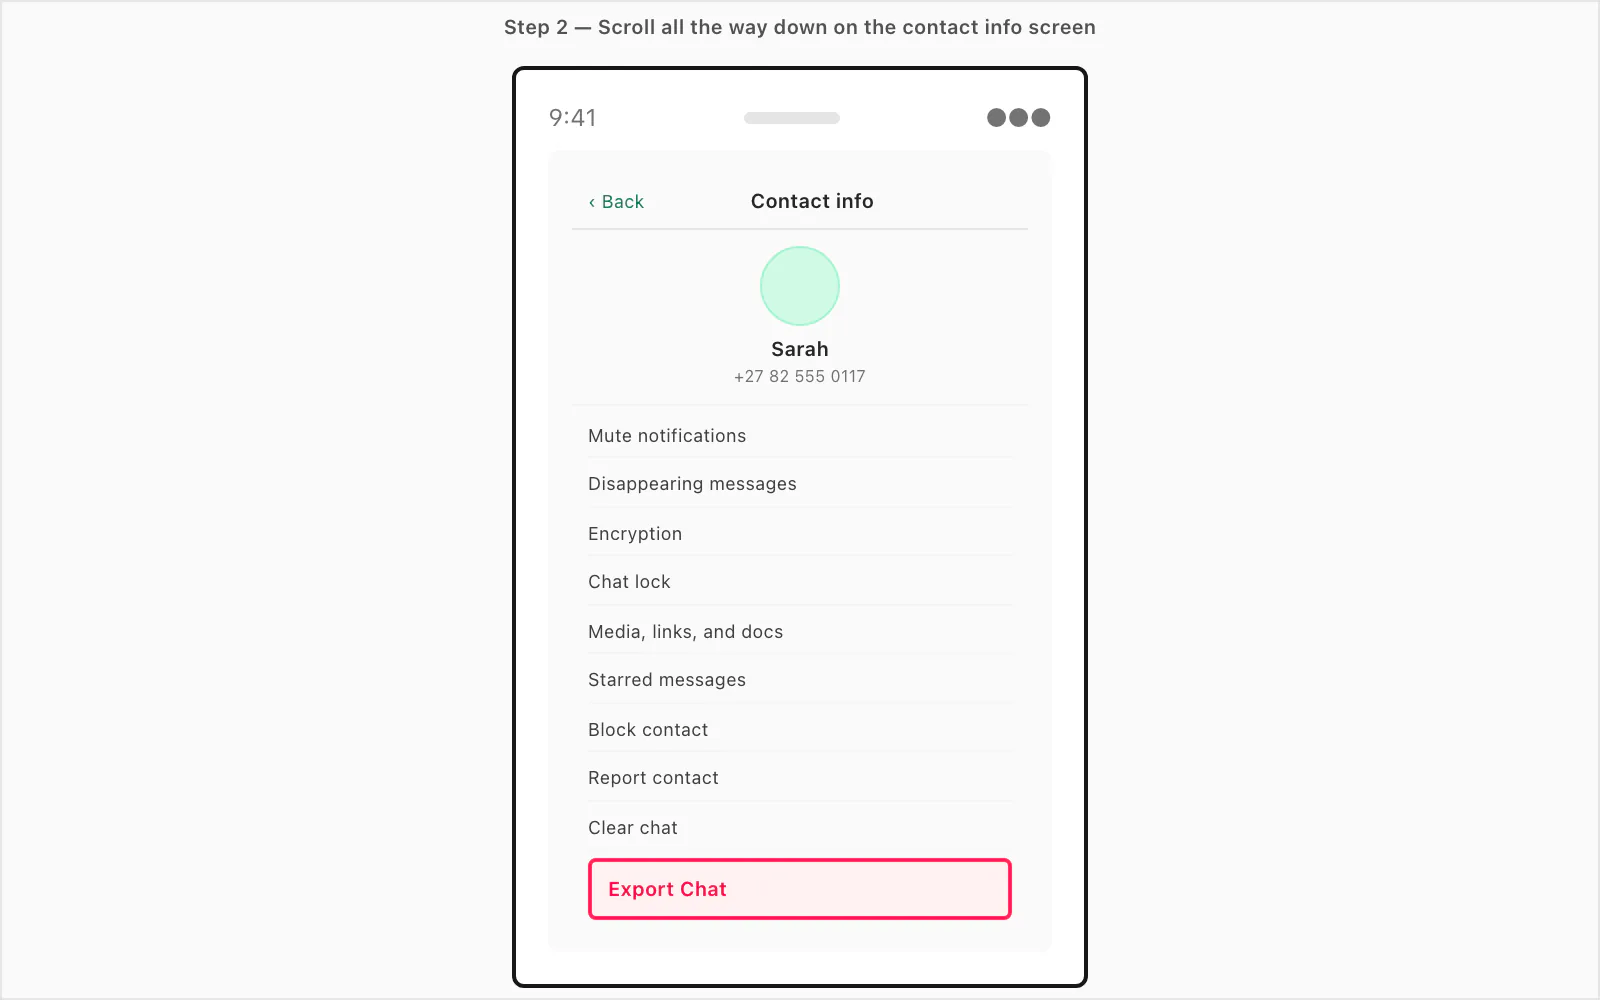
Scroll all the way to the bottom of the info screen
The Export Chat button is at the bottom — past Mute, Disappearing Messages, Encryption, Chat Lock, Media-Links-and-Docs, Starred Messages, Block, Report, and Clear Chat. On most iOS versions the button is in red text. If you do not see it, keep scrolling — it is below "Clear chat" on iPhone WhatsApp v24.x.
Tap Export Chat and pick Without Media or Including Media
WhatsApp asks one question: include the photos, voice notes, and documents that were sent in the chat, or just the text? Without Media gives you a small ZIP containing only
_chat.txt. Including Media gives you a larger ZIP with all the attached files alongside. For a PDF, almost always pick Including Media — that is what makes the photos render inline.Pick Save to Files in the iOS share sheet
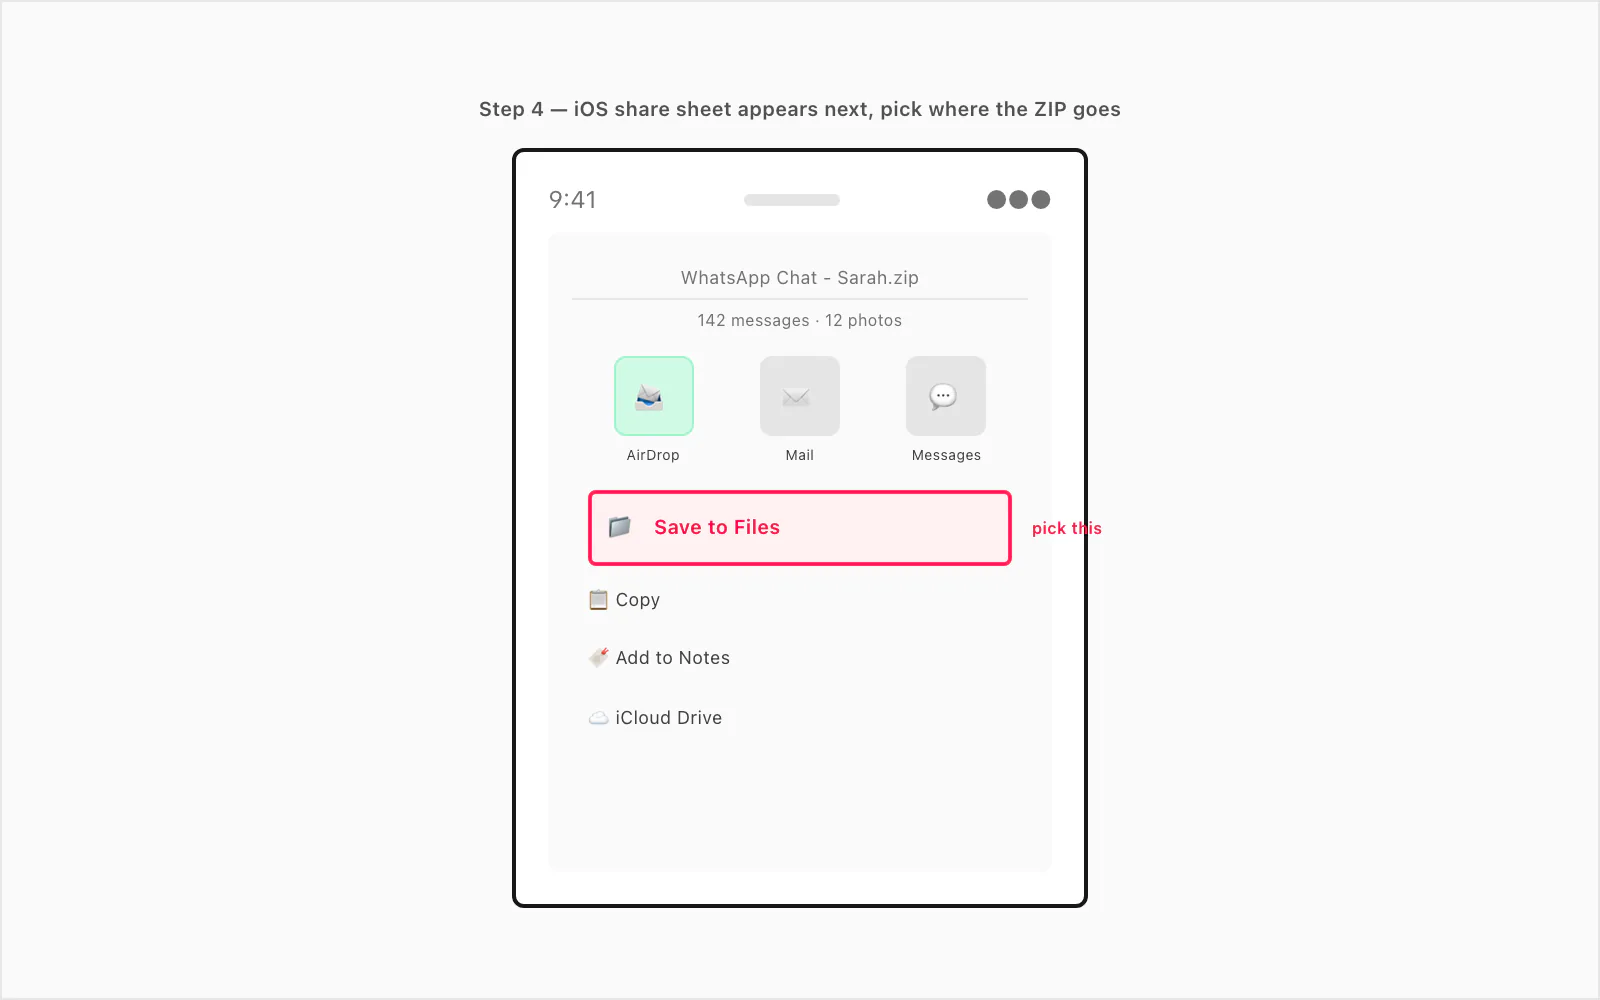
iOS hands you a share sheet. AirDrop, Mail, Messages, Notes, iCloud Drive, and Save to Files are the most common options. Pick Save to Files. AirDropping the ZIP to yourself works but adds an extra step. Mailing it to yourself works for small Without-Media exports but fails for Including-Media exports above ~25 MB attachment limits. Save to Files is the path that always works.
Choose On My iPhone or iCloud Drive and a folder
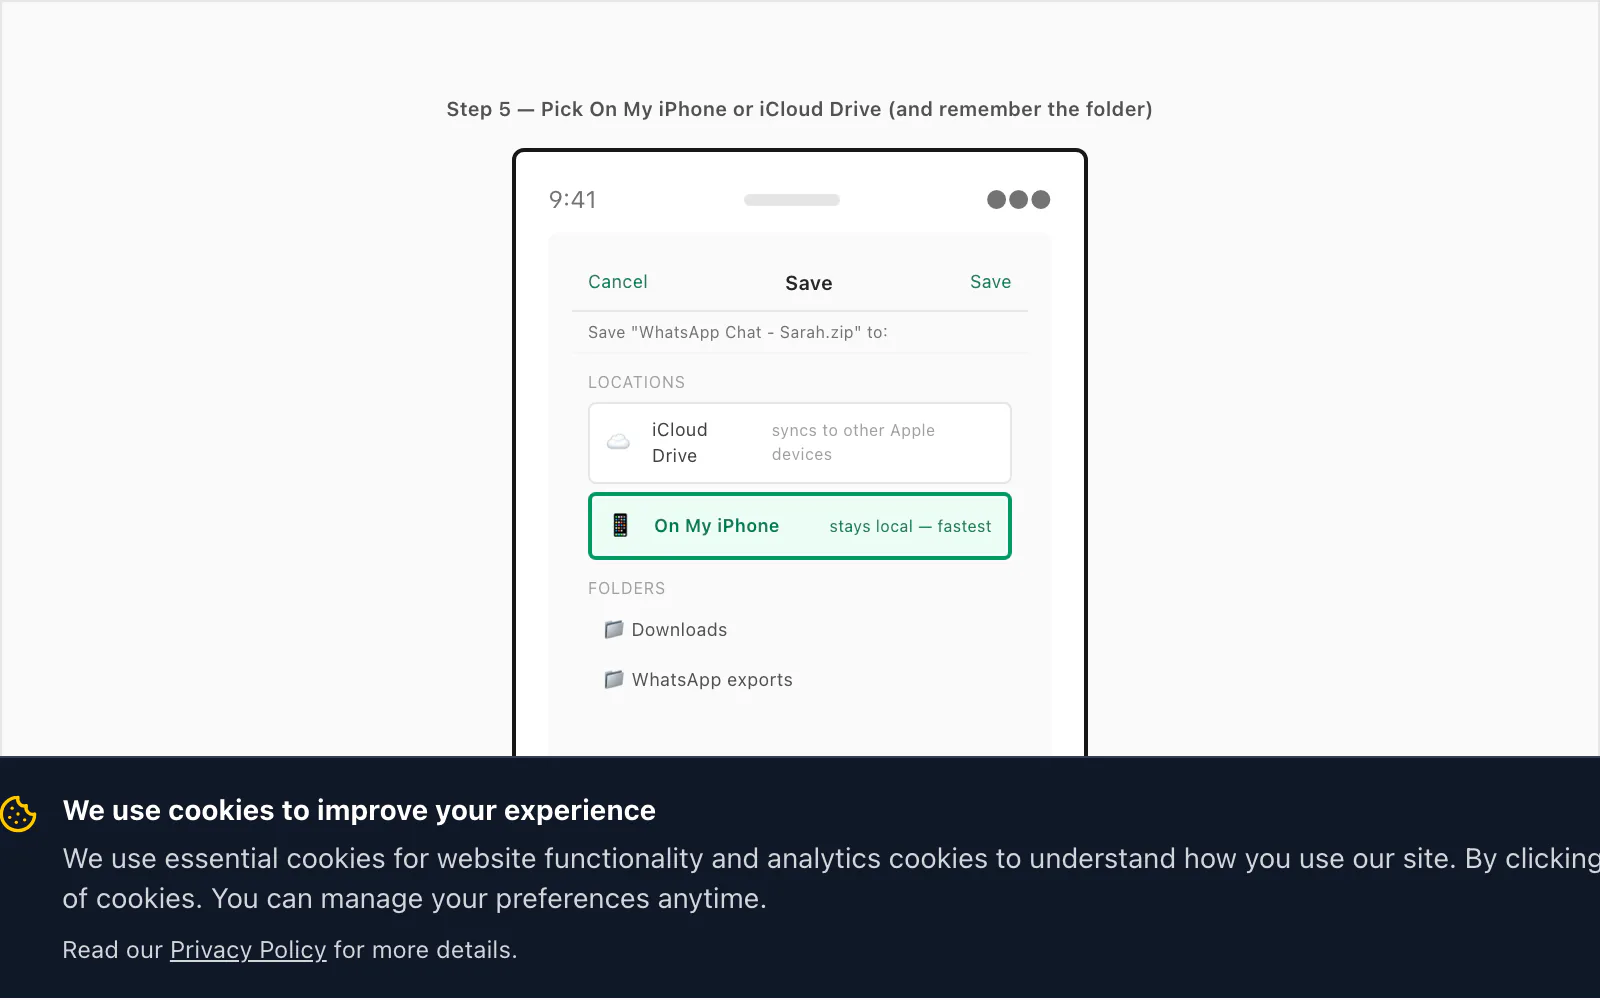
The Save dialog asks where the ZIP should land. On My iPhone keeps it local and is fastest. iCloud Drive is fine if iCloud has space and you want the ZIP available on a Mac too. Pick a folder you will remember — Downloads is the default, and that is fine. Tap Save.
That is the entire WhatsApp side of the workflow. From here the ZIP exists as a real file on your iPhone, and the rest of the work — turning it into a readable PDF — happens at chattopdf.app in the next 30 seconds. The companion guide Export WhatsApp chat to PDF covers the chattopdf side in detail, with screenshots of the upload area and what the resulting PDF looks like.
Without Media vs Including Media — pick once, live with it
The single decision in the WhatsApp half of the workflow is the Without Media versus Including Media question. Most guides treat this like a one-line throwaway. It actually shapes the entire output, so I want to spell it out.
| Option | What goes in the ZIP | When to pick it |
|---|---|---|
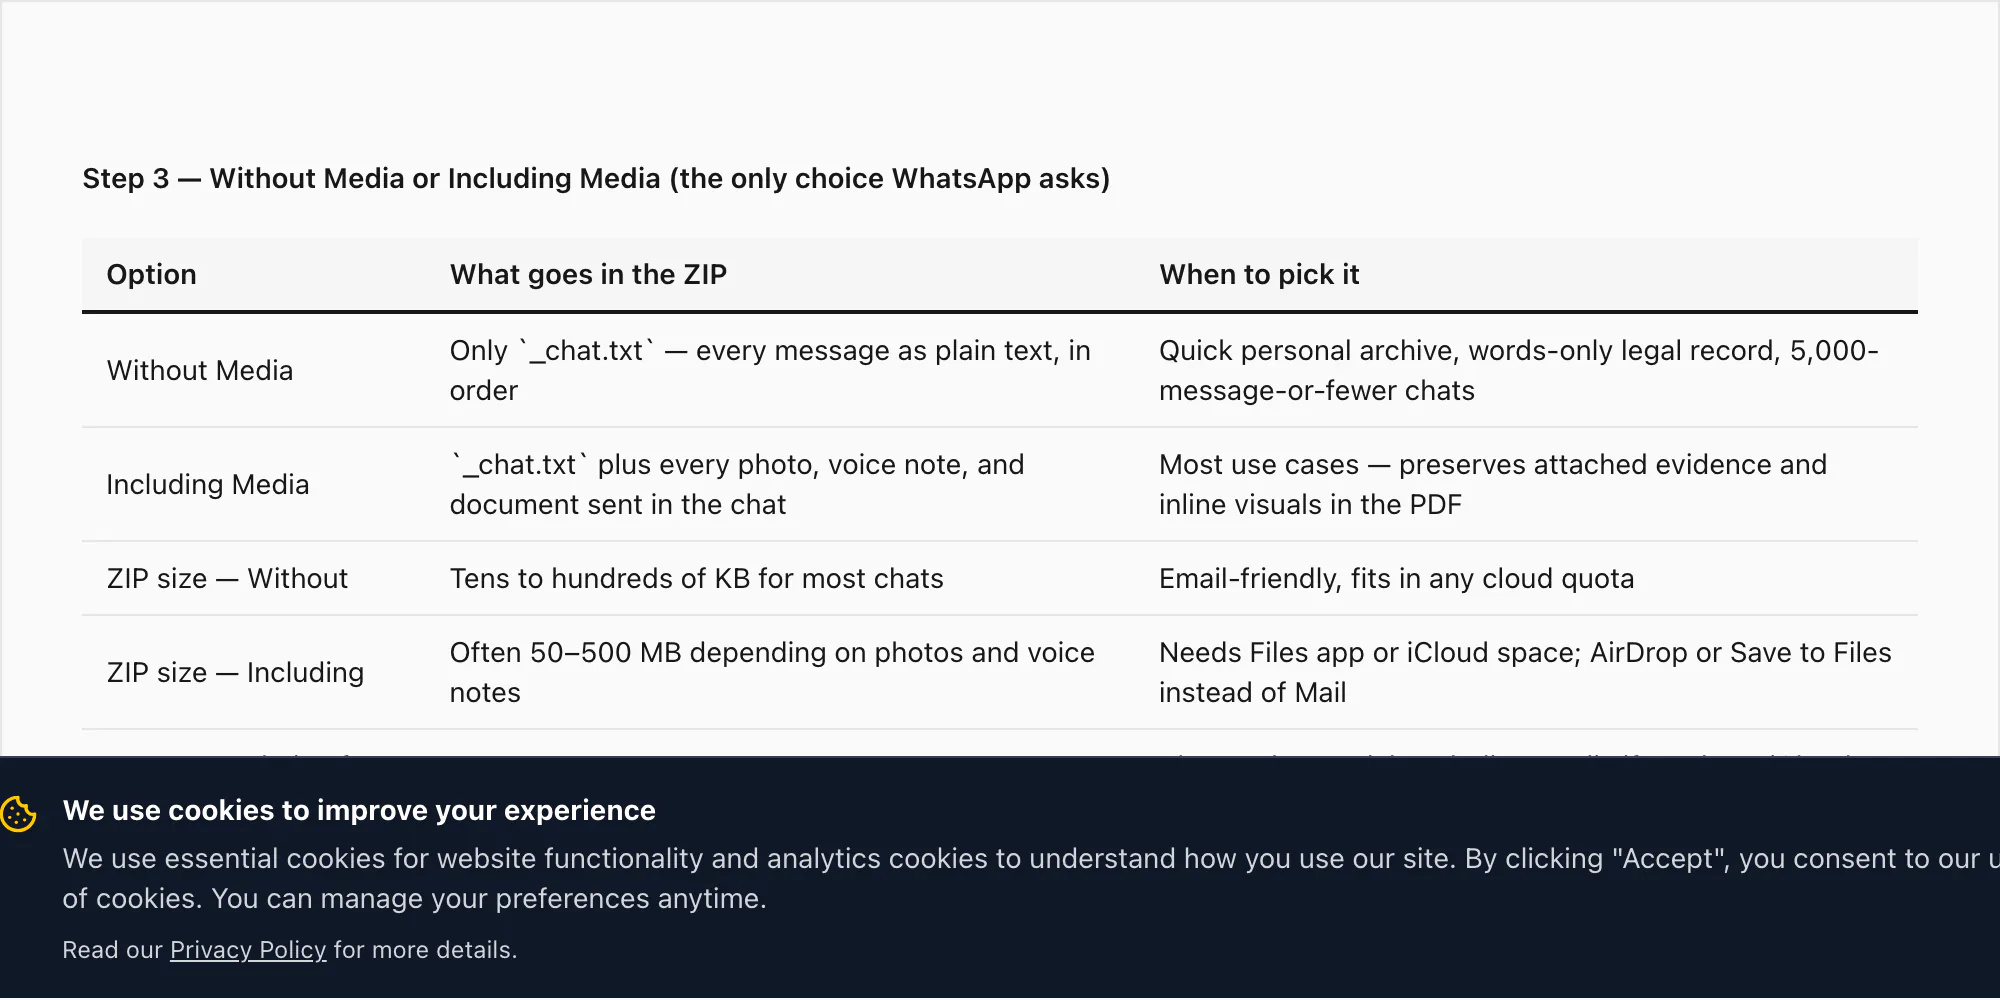
| Without Media | Only `_chat.txt` — every message rendered as plain text in chronological order | Quick personal archive, words-only legal record, very long chats where photos are not the point |
| Including Media | `_chat.txt` plus every photo, voice note, and document that was sent in the chat | Most use cases — preserves photos for the PDF and keeps voice notes available for transcription |
| ZIP size — Without | Tens to hundreds of KB for most chats; rarely above 5 MB | Email-friendly, fits in any iCloud quota, AirDrops in seconds |
| ZIP size — Including | Often 50–500 MB depending on photos and voice notes; multi-GB for years-long chats with media | Save to Files instead of Mail; needs On My iPhone space or iCloud Drive headroom |
| Effect on the PDF | Text-only PDF — sender-attributed but no inline photos | Pick Without Media only if you do not need photos in the PDF |
| Effect with PDF | Inline photos render in the PDF, voice notes can be transcribed at $49 Premium+Voice per chat | Including Media plus the right tier is the typical iPhone-export choice |
A small thing worth saying: the choice is one-shot. WhatsApp does not let you go back and re-export with the other option without redoing the whole flow. Pick Including Media unless you have a specific reason not to — storage pressure on the iPhone, an iCloud quota that is already full, or a deliberate need for a text-only artifact.
If your iPhone is tight on storage and the Including Media ZIP would be huge, save it to iCloud Drive instead of On My iPhone. iCloud handles the upload in the background and the file appears in the Files app once synced. The pillar WhatsApp chat export covers what is and is not in the export at the data-model level — including the calls, reactions, and read receipts that do not survive the conversion regardless of which option you pick.
Where the ZIP lands — On My iPhone vs iCloud Drive
The Save to Files target picker on iOS gives you two top-level options that look similar but behave differently in practice. Worth understanding the difference before you tap one.
On My iPhone keeps the file on the device only. It does not sync to iCloud, does not appear on a Mac unless you AirDrop it across, and is the fastest save target. If your iCloud is tight on storage or you are about to upload the ZIP to a website (chattopdf, for example) from the same iPhone, On My iPhone is the better pick. The folder structure under On My iPhone is per-app — there is a Files folder, a Downloads folder, and folders that other apps have created.
iCloud Drive uploads the file to iCloud and syncs it to every other Apple device signed into the same Apple ID. If you want the ZIP available on a Mac (because you are going to do the chattopdf upload from a desktop browser instead of mobile Safari), iCloud Drive is right. The catch: iCloud needs free space, and if iCloud is full the save fails silently — the file shows up in Files briefly and then vanishes when iCloud refuses to host it. The pillar WhatsApp Android to iPhone covers the iCloud-versus-Google Drive split in more detail; for a pure-iOS export, the two options to weigh are the local one and the iCloud one.
For most people doing an iPhone-only export, On My iPhone → Downloads is the recommended save target. It is fast, predictable, and the Files app surfaces the Downloads folder near the top of the Browse view, so finding the ZIP later takes one tap.
Finding the ZIP later in the Files app
The single most common moment of friction after the export is "I exported it but where did it go?". This is solvable in two taps if you saved to On My iPhone → Downloads or iCloud Drive → wherever-you-picked.
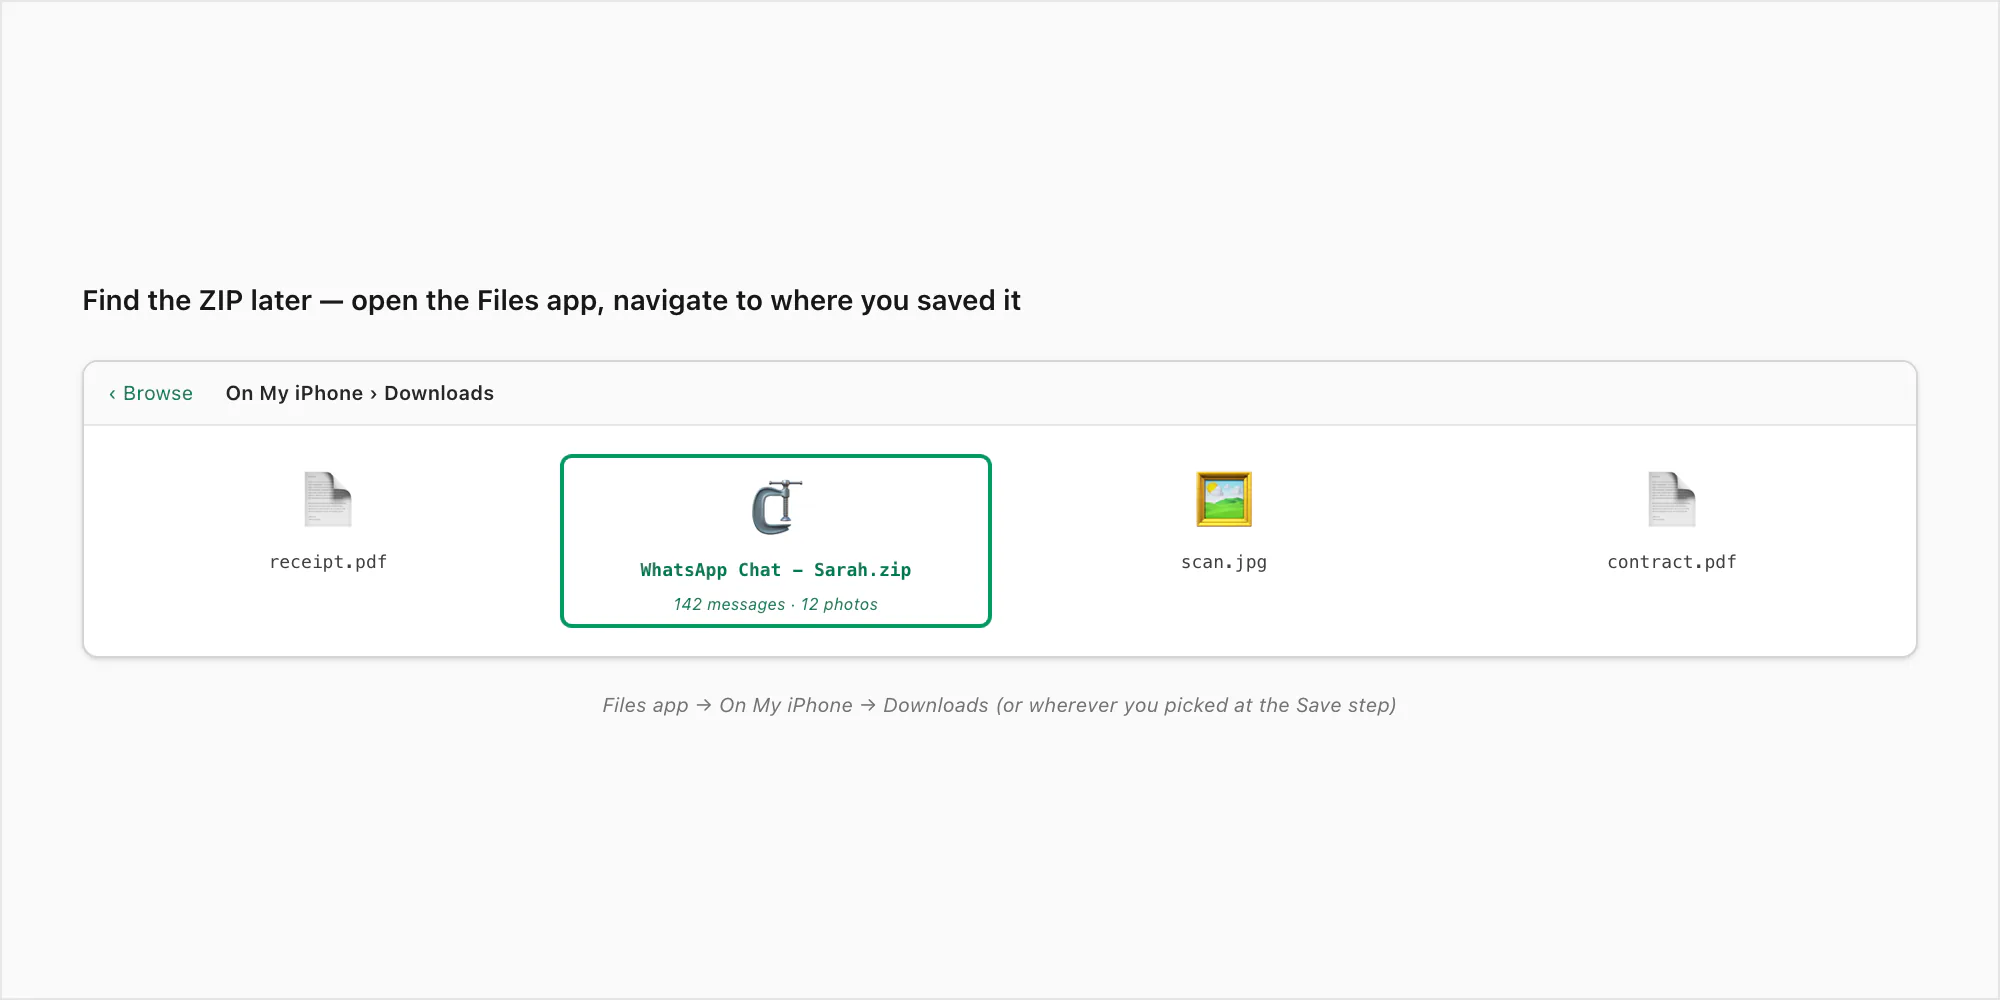
Open the Files app on the iPhone. The icon is a blue folder; if it is not on your home screen, swipe down on the home screen and search "Files". Tap Browse at the bottom of Files. The top of the Browse view shows Locations: iCloud Drive, On My iPhone, and Recents. Tap whichever location matches where you saved the ZIP. Inside that location, navigate to the folder you picked at the Save step (usually Downloads). The ZIP is there, named something like WhatsApp Chat - Sarah.zip or WhatsApp Chat - Project Group.zip.
If you cannot find it, the Recents tab at the bottom of Files lists the last 30 or so files saved across all locations, ordered by save time. Your fresh WhatsApp export will be at the top. This rescues most cases where someone forgot which target they picked at Save time.
Apple's Files app support documentation covers the Files navigation in detail if you have not used the app much before. For most chattopdf users, two taps — Browse → Recents — is enough to find a fresh export.
From the iPhone Files app to a finished PDF
The chattopdf side of the workflow is short. Once you have the ZIP in the Files app, you have two ways to upload it: from the iPhone itself in Safari, or from a Mac (if you saved to iCloud Drive). Both end at the same place — a sender-attributed PDF in your inbox, usually in under 30 seconds.
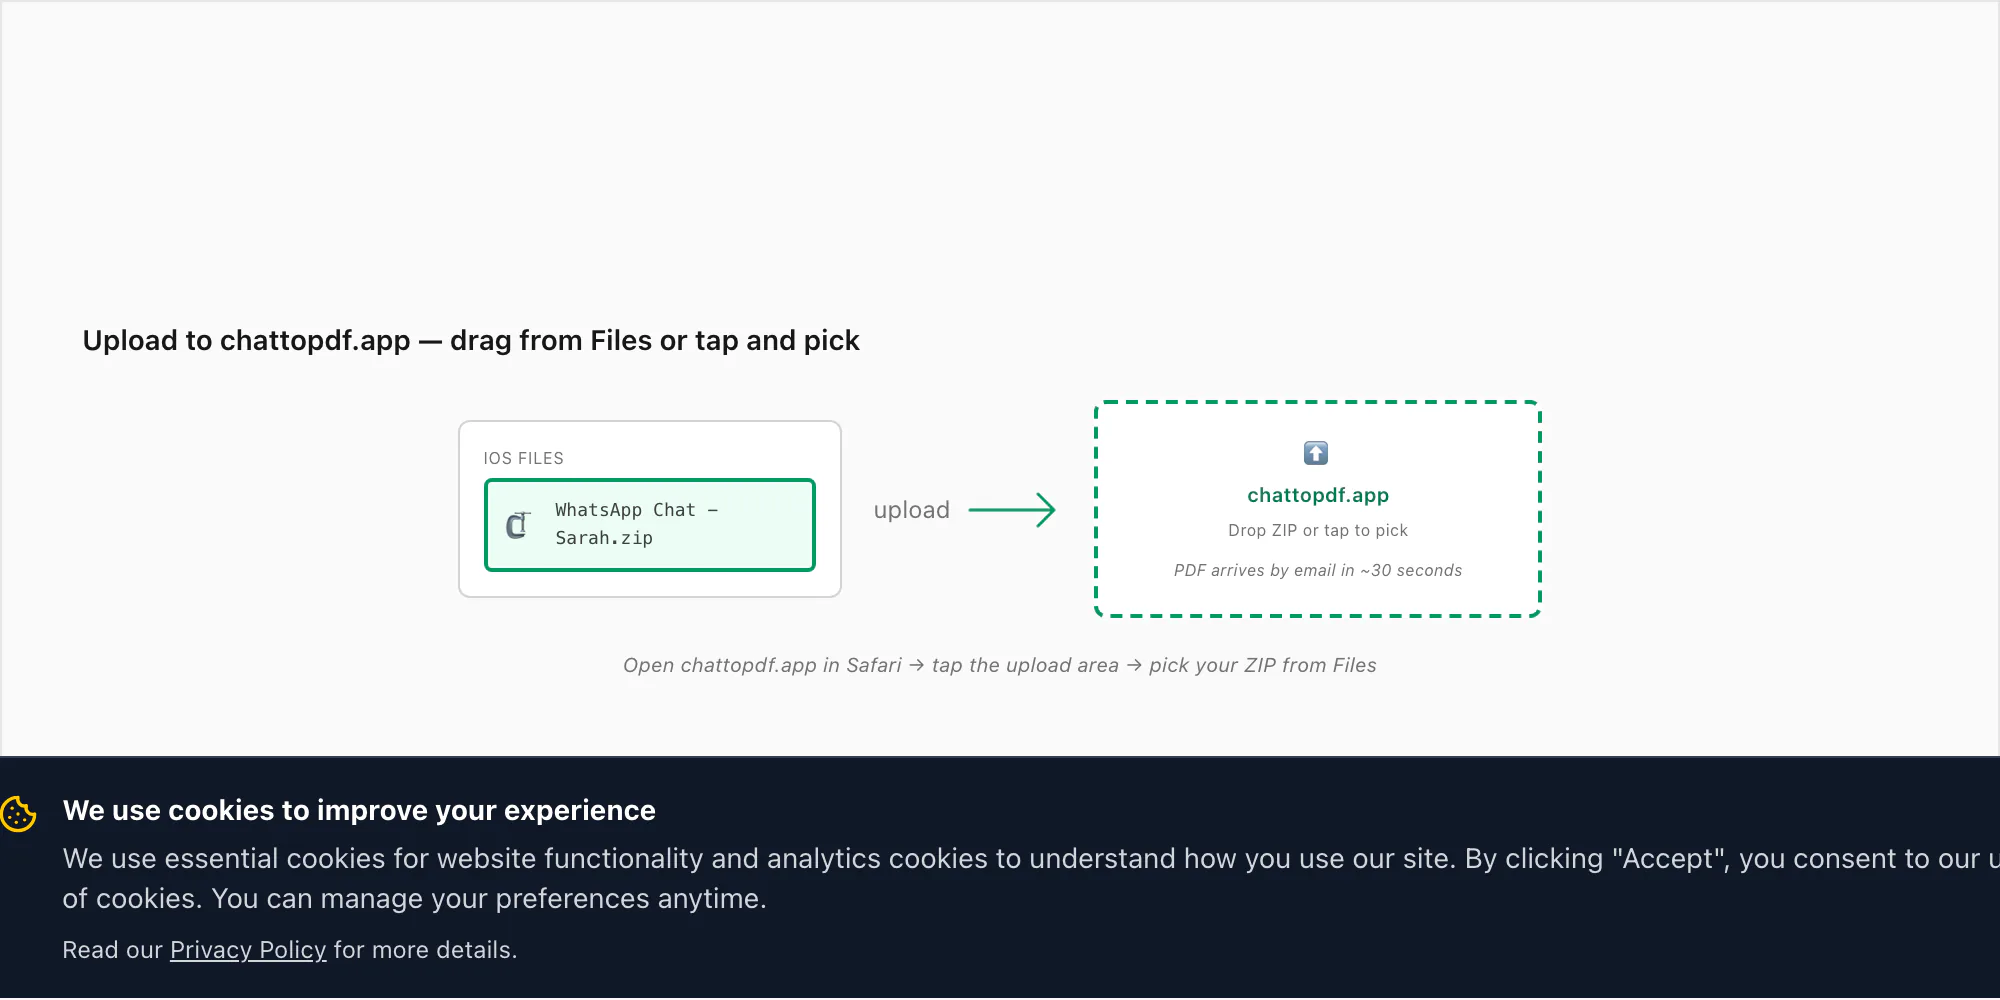
From the iPhone in Safari: open chattopdf.app in Safari. Scroll to the upload area on the home page. Tap the area — Safari opens a file picker. Pick "Choose File", which opens an iOS picker that lets you choose from Photos, the Files app, or other sources. Pick Files, navigate to where you saved the ZIP, and tap it. Safari uploads it and the chattopdf workflow continues — you pick a tier, pay, and the PDF arrives by email.
From a Mac (if you saved to iCloud Drive): open Finder, go to iCloud Drive, find the ZIP. Open chattopdf.app in Safari (or any browser) on the Mac, drag the ZIP onto the upload area, pick a tier, pay, get the PDF. Some people prefer this path because filling in card details on a desktop browser is more pleasant than on mobile.
The companion guide Export WhatsApp chat to PDF walks through the chattopdf upload screen, the tier-pick step, and what the resulting PDF looks like with inline photos and timestamps. The whole iPhone-to-PDF flow — from opening WhatsApp to opening the email with the PDF — runs under two minutes for a typical conversation. WhatsApp's own export chat history FAQ confirms the menu structure and limits at the source.
iOS-specific gotchas — what silently breaks the export
Most guides skip this part. The export workflow above works perfectly when nothing else interferes. Four things on iOS interfere often enough to deserve calling out — they tend to fail silently, which is the worst kind of failure.
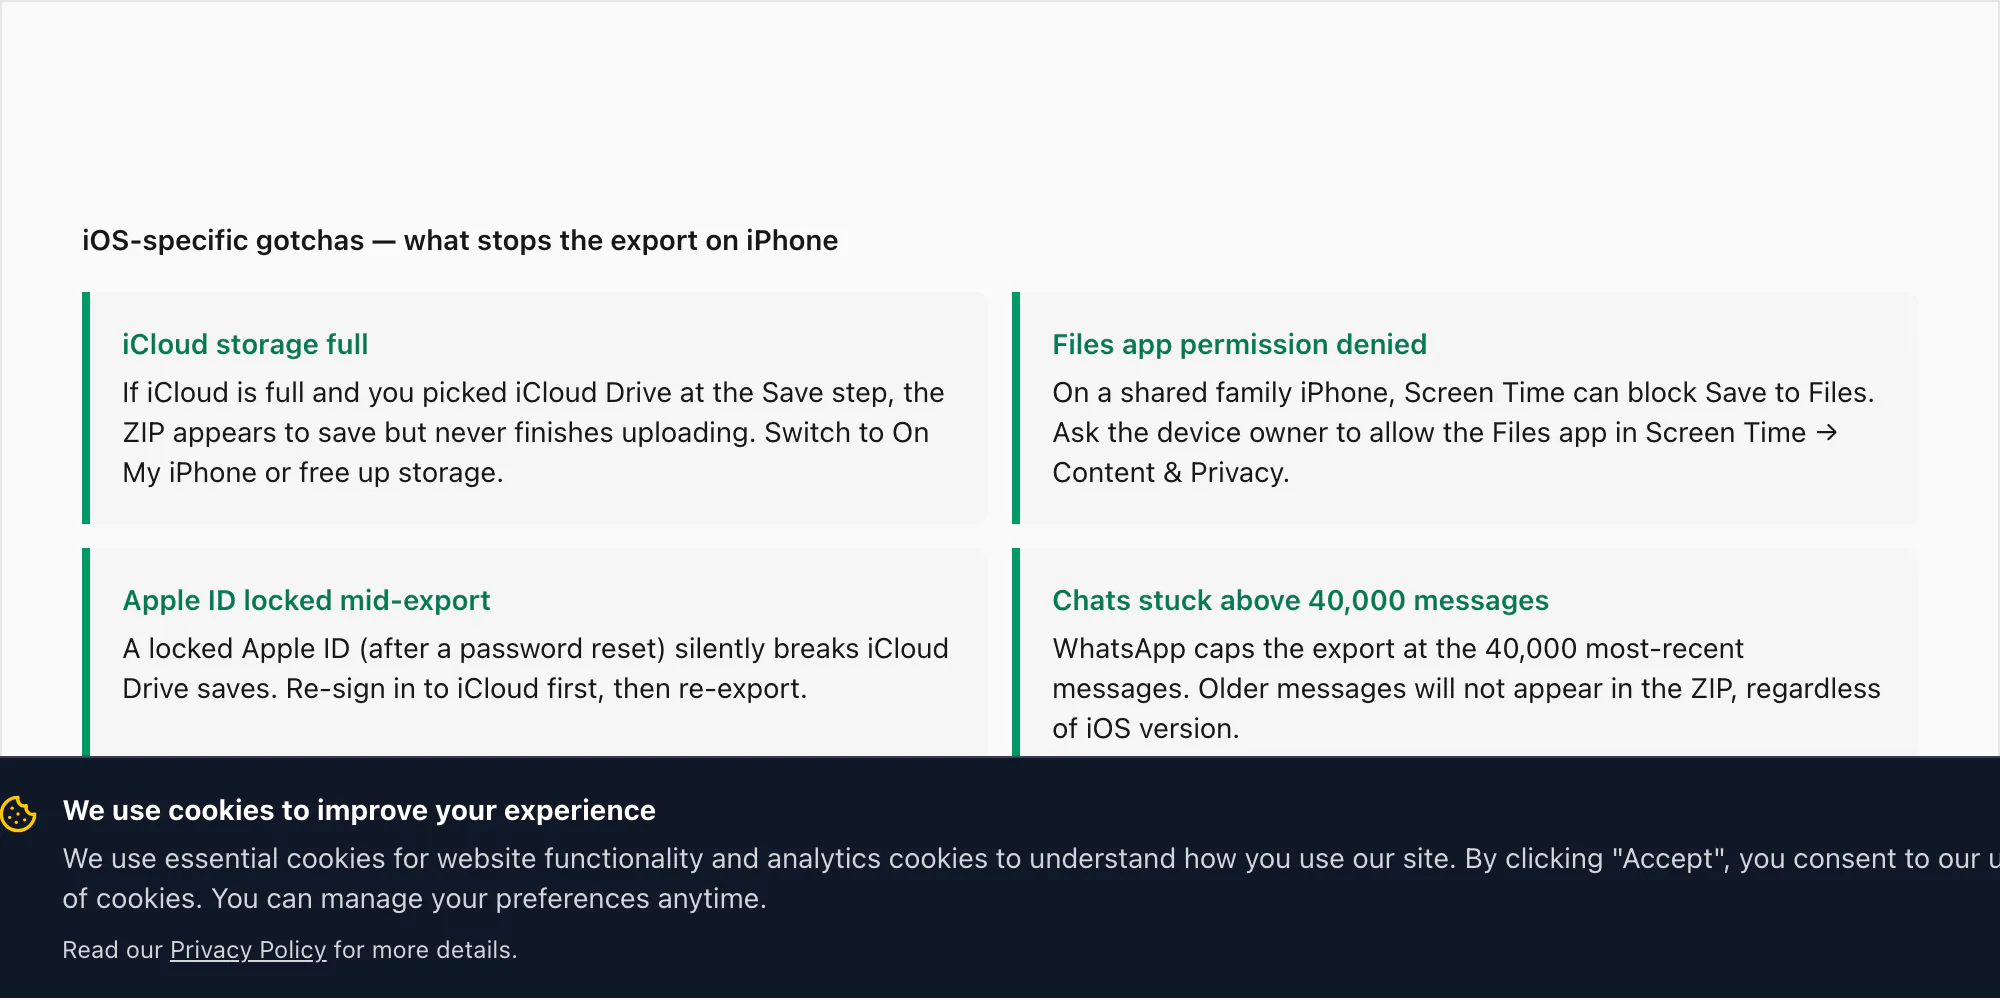
iCloud Drive quota full. If you picked iCloud Drive at the Save step and iCloud is at or near the 5 GB free tier limit (or whatever quota you are paying for), the Save action appears to succeed — the dialog dismisses, the file briefly shows up in Files — but iCloud refuses to host the ZIP and it vanishes once the local cache clears. The fix: pick On My iPhone instead, or free up iCloud space by deleting old backups (Settings → [your name] → iCloud → Manage Account Storage). If the ZIP is large, On My iPhone is the safer save target by default.
Files app permission denied via Screen Time. On a shared family iPhone, the device owner may have restricted the Files app via Screen Time → Content & Privacy Restrictions. If Files is restricted, the Save dialog still opens but the save itself fails. The fix: ask the owner to allow Files in Screen Time, or AirDrop the ZIP to a different device that does not have the restriction.
Apple ID locked mid-export. If your Apple ID was reset or temporarily locked (a common after-effect of a forgotten password), iCloud Drive saves fail until you re-sign in. Settings → [your name] at the top will show the lock state. Re-sign in to iCloud, then re-export from WhatsApp.
The 40,000-message ceiling. WhatsApp caps every export at the 40,000 most-recent messages, regardless of iOS version. If your chat has more than that, the older messages will not appear in the ZIP — there is no warning, the export just contains the most recent 40,000 lines. This is a WhatsApp limit, not an iOS one. For very long chats — group threads running for years — the download chat history WhatsApp guide covers what to do about the ceiling.
These four cover roughly 90% of the "I followed the steps but it did not work" reports. The other 10% are usually old WhatsApp versions (update WhatsApp via the App Store) or extremely large Including Media exports timing out (re-export with Without Media, or use iCloud Drive with extra patience).
Pricing — which tier fits an iPhone export
The chattopdf side of the workflow charges per chat. The right tier for an iPhone-exported chat depends on the chat itself, not the export method. Five tiers, all per chat per conversion.
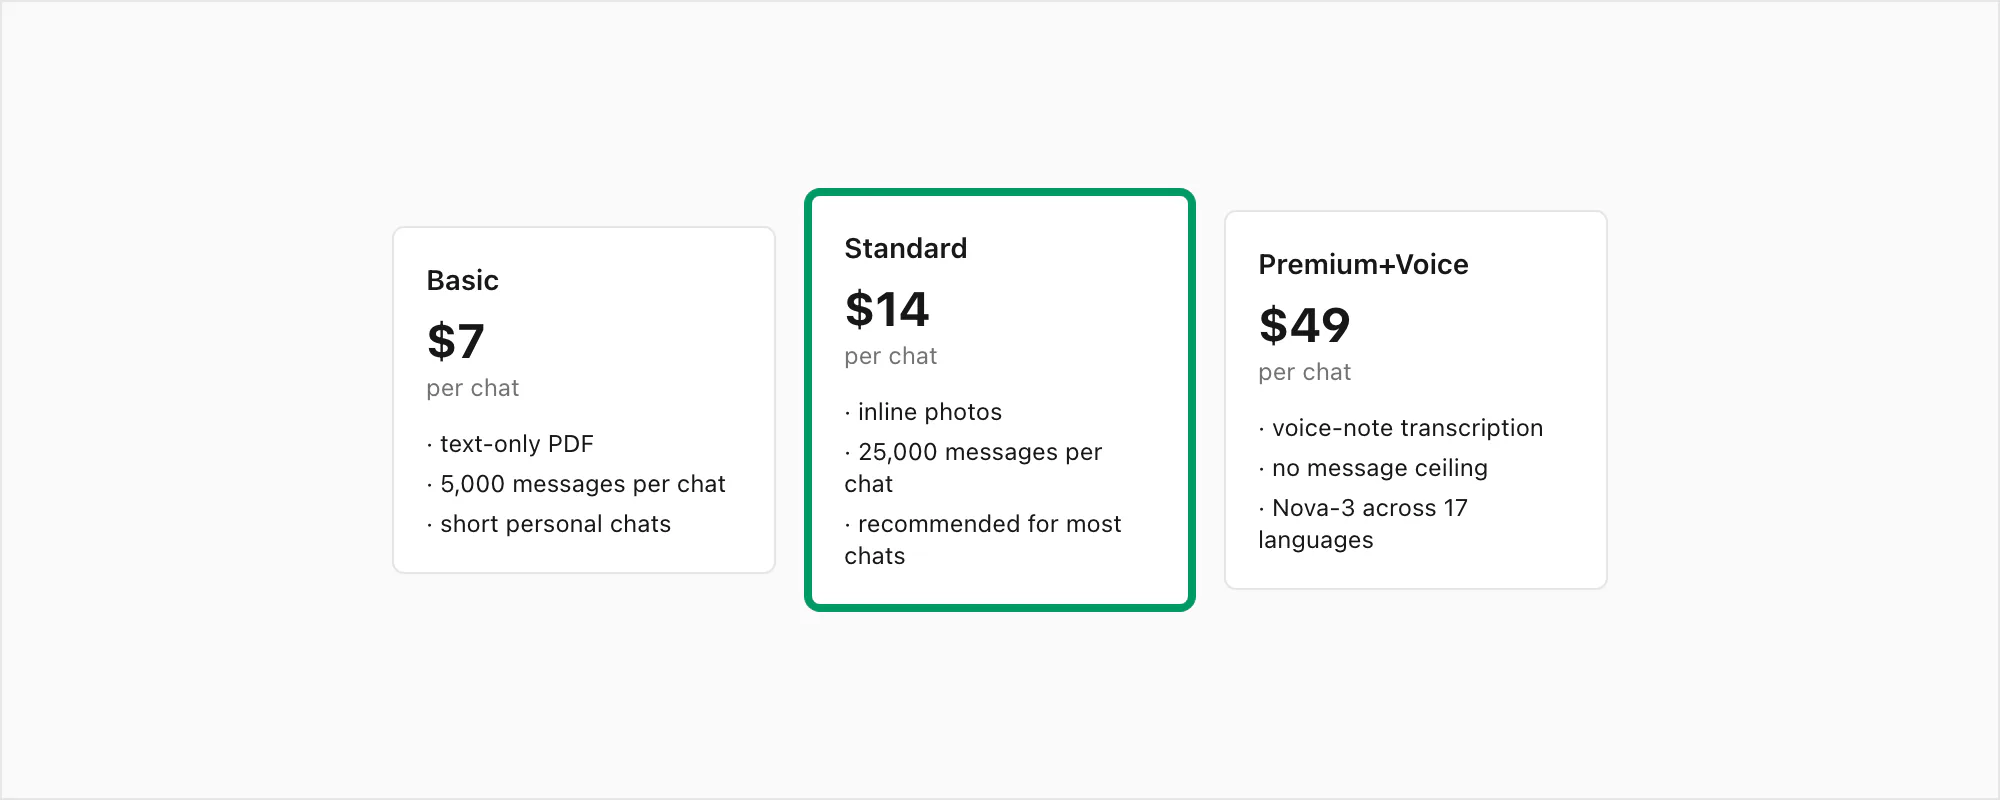
$7 Basic per chat is text-only — fine for short personal chats with no photos and under 5,000 messages. If you exported with Without Media and your chat is small, this tier covers it.
$14 Standard per chat is the recommended tier for most iPhone exports. Inline photos render in the PDF if you exported with Including Media, the per-chat ceiling is 25,000 messages, and every distinct sender appears in attribution. This is the tier I recommend for the typical iPhone single-chat export.
$29 Premium per chat removes the per-chat message ceiling and adds an XLSX/CSV export alongside the PDF. Useful for very long chats — over 25,000 messages — or for cases where you want the data in a spreadsheet for analysis.
$49 Premium+Voice per chat adds Deepgram Nova-3 voice-note transcription on top of Premium. Most personal and many professional iPhone chats include voice notes, and this tier transcribes them inline in the PDF — automatic language detection across 17 high-accuracy languages and 30+ at a wider accuracy range. The transcribe WhatsApp audio guide covers the voice pipeline in depth.
$99 Power User per chat adds priority queue processing and bulk-conversion support. Useful when you have several chats from the same iPhone to convert in one session.
Each conversion is real work against the chat as it existed at the moment of export. There is no recurring charge, no monthly fee, no plan to manage. You pay per chat, you get the PDF, that is the bill. Re-export the same chat a month later and convert again — that is a separate conversion and a separate payment.
Key takeaways
- The Export Chat menu on iPhone is hidden at the bottom of the contact info or group info screen — reach it by tapping the chat title at the very top of the chat, then scrolling all the way down past Block, Report, and Clear Chat.
- The full iOS workflow is six taps: open chat → tap title → scroll down → Export Chat → Without Media or Including Media → Save to Files. From there the ZIP lands in the iOS Files app under On My iPhone or iCloud Drive.
- Pick Including Media unless you have a storage reason not to — that is what gets photos rendered inline in the PDF and what makes voice notes available for transcription at the $49 Premium+Voice per chat tier.
- On My iPhone is the recommended save target for most iPhone-only exports because it is fast, predictable, and avoids the silent failure that happens when iCloud Drive is at quota.
- Find the ZIP later in the Files app under Browse → Recents (sorted by save time) or under the location and folder you picked at the Save step.
- The four iOS-specific gotchas that silently break the export: iCloud quota full, Files app restricted via Screen Time, a locked Apple ID after a password reset, and the WhatsApp 40,000-message ceiling.
- The chattopdf side runs in roughly 30 seconds — drag the ZIP from Files into chattopdf.app in Safari, pick the $14 Standard per chat tier for most chats, pay, get the PDF by email.
- For what the PDF looks like and how the different tiers handle photos and voice notes, see the WhatsApp to PDF guide.
FAQ
Where exactly is the Export Chat button on iPhone?
At the bottom of the contact info or group info screen, which you reach by tapping the chat title at the top of the chat. The button is in red text on most iOS versions of WhatsApp (v24.x and later). The path is: open WhatsApp → tap the chat → tap the contact's or group's name at the very top → scroll past Mute, Disappearing Messages, Encryption, Chat Lock, Media-Links-and-Docs, Starred Messages, Block, Report, and Clear Chat → Export Chat. There is no three-dot menu on iPhone WhatsApp — the iOS layout is genuinely different from Android, which is why so many guides confuse people. If you cannot find Export Chat, you almost certainly have not yet tapped the chat title at the top.
What is the difference between Without Media and Including Media on iPhone?
Without Media puts only _chat.txt in the ZIP — every message as plain text in chronological order, with timestamps and sender names. The ZIP is small (tens to hundreds of KB for most chats). Including Media puts _chat.txt plus every photo, voice note, and document that was sent in the chat, in the same flat folder. The ZIP is larger (often 50–500 MB depending on photos and voice notes; sometimes multi-GB for very long chats). For a PDF, almost always pick Including Media — that is what makes photos render inline in the resulting PDF. Pick Without Media only if you have storage pressure on iCloud or specifically want a text-only artifact.
Why can't I find the ZIP after I exported it on iPhone?
The Files app is where the ZIP lives — iOS does not put it on the home screen, in Photos, or in WhatsApp itself. Open the Files app (blue folder icon), tap Browse at the bottom, and look under either On My iPhone or iCloud Drive depending on which location you picked at the Save step. The default folder is usually Downloads. If you cannot remember where you saved it, tap the Recents tab at the bottom of Files — it shows the last 30 or so files saved across all locations, ordered by save time, so a fresh WhatsApp export will be near the top.
Can I export a WhatsApp chat from iPhone to a Mac?
Yes — three paths work. The simplest: pick iCloud Drive at the Save to Files step, and the ZIP appears on the Mac automatically once iCloud syncs (usually within a minute). The second: AirDrop the ZIP from iPhone Files to the Mac — iOS shows the AirDrop option in the share sheet alongside Save to Files. The third: email the ZIP to yourself, but only if it is small (Without Media exports under 25 MB — Mail rejects large attachments). For Including Media exports, iCloud Drive or AirDrop are the practical paths. Once on the Mac, drag the ZIP into chattopdf.app in any browser to convert it to a PDF.
How long does the iPhone WhatsApp export to PDF take end to end?
About two minutes for a typical chat. The WhatsApp half — open chat, tap title, scroll down, Export Chat, pick media option, Save to Files, pick folder — is roughly 90 seconds once you know the path. The chattopdf half — open chattopdf.app in Safari, upload the ZIP, pick a tier, pay, wait for the email — is roughly 30 seconds for a chat under 25,000 messages at $14 Standard per chat. The biggest variable is the Including Media ZIP size: a chat with thousands of photos and voice notes can take a minute or two to upload over a slow connection. The processing time on the chattopdf side is consistent regardless of chat size at the Standard and Premium tiers.
I'm Paul. I built ChatToPDF after watching a friend try to print a 4-year-old WhatsApp chat across forty-something one-page PDFs. I write here about exporting WhatsApp chats, converting them to PDF, transcribing voice notes, and the messy edge cases nobody else writes about (40,000-message export limits, broken emojis, RTL Arabic, Samsung Secure Folder).